Nebulosity 3.0.5
Multi-set pre-processing begun
H:\_ Astro2012\120719 C11 63 M57 M27 vega 63\Flat 1.5 sec 6.3 reducer_010.fit
H:\_ Astro2012\120719 C11 63 M57 M27 vega 63\Flat 1.5 sec 6.3 reducer_009.fit
H:\_ Astro2012\120719 C11 63 M57 M27 vega 63\Flat 1.5 sec 6.3 reducer_008.fit
H:\_ Astro2012\120719 C11 63 M57 M27 vega 63\Flat 1.5 sec 6.3 reducer_007.fit
H:\_ Astro2012\120719 C11 63 M57 M27 vega 63\Flat 1.5 sec 6.3 reducer_006.fit
H:\_ Astro2012\120719 C11 63 M57 M27 vega 63\Flat 1.5 sec 6.3 reducer_005.fit
H:\_ Astro2012\120719 C11 63 M57 M27 vega 63\Flat 1.5 sec 6.3 reducer_004.fit
H:\_ Astro2012\120719 C11 63 M57 M27 vega 63\Flat 1.5 sec 6.3 reducer_003.fit
H:\_ Astro2012\120719 C11 63 M57 M27 vega 63\Flat 1.5 sec 6.3 reducer_002.fit
-- Stacked flats: (9) Flat 1.5 sec 6.3 reducer_010.fit into C:\Documents and Settings\Edhiker\Application Data\Nebulosity3\MPPtmp2068_flat0.fit
D:\My Pictures\__--Stacking\Dark 600s -15c_001.fit
D:\My Pictures\__--Stacking\Dark 600s -15c_002.fit
D:\My Pictures\__--Stacking\Dark 600s -15c_003.fit
D:\My Pictures\__--Stacking\Dark 600s -15c_004.fit
D:\My Pictures\__--Stacking\Dark 600s -15c_005.fit
D:\My Pictures\__--Stacking\Dark 600s -15c_006.fit
D:\My Pictures\__--Stacking\Dark 600s -15c_007.fit
D:\My Pictures\__--Stacking\Dark 600s -15c_008.fit
-- Stacked darks: (8) Dark 600s -15c_001.fit into C:\Documents and Settings\Edhiker\Application Data\Nebulosity3\MPPtmp2068_dark0.fit
Processing light set 1 -- 1 lights to process
Dark(0): C:\Documents and Settings\Edhiker\Application Data\Nebulosity3\MPPtmp2068_dark0.fit
Flat: C:\Documents and Settings\Edhiker\Application Data\Nebulosity3\MPPtmp2068_flat0.fit(filt=1)
Bias:
Pre-process images
C:\Documents and Settings\Edhiker\Application Data\Nebulosity3\MPPtmp2068_dark0.fit loaded as dark
C:\Documents and Settings\Edhiker\Application Data\Nebulosity3\MPPtmp2068_flat0.fit loaded as flat - processing mode 1
Pre-processing images...
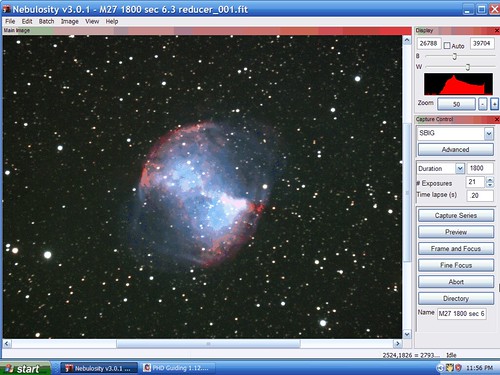
H:\_ Astro2012\120719 C11 63 M57 M27 vega 63\M27 1800 sec 6.3 reducer_001.fit
Demosaic image
Auto color balance
Saving H:\_ Astro2012\120719 C11 63 M57 M27 vega 63\M27 1800x1_flats_ old-600sDarks C11-63.jpg
DDP: Bkg=100 Xover=8078 B-Power=1.00 Sharp=1
Saving H:\_ Astro2012\120719 C11 63 M57 M27 vega 63\M27 1800x1_flats_ old-600sDarks C11-63 DDSedge.jpg
Friday, July 20, 2012
M27 - screen capture
Tuesday, May 08, 2012
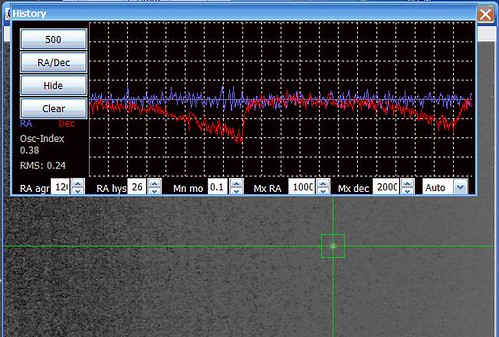
CGEM mounts fail to autoguide correctly.
This keeps coming up on the chat board.
Many times confused with mechanical backlash.
Cause of DEC guiding problem in CGEM and a solution - rotor bushing fit with a bit of friction.
http://tech.groups.yahoo.com/group/CelestronCGEM/message/9123
................
CGEM and CGEM DX Specifications ... (2012)
Motor Drive: Low cog DC Servo motors with encoders, both axes
"motor armatures are skewed to minimize cogging during low speed operation"
http://celestronsites.com/engineering/cgem-cgem-dx-mount/
.................
"Well, we are close. The encoders just keep track of motor movement.
"work" the encoders send information to the motor control board no matter which
direction in order for the motor control board.."
..." Call Celestron and talk to a service "engineer" and he will tell you what Ed,
Steve, and others are saying is true. They are working on a fix. "
http://tech.groups.yahoo.com/group/CelestronCGEM/message/9246
..........
Motor types in CGEM http://tech.groups.yahoo.com/group/CelestronCGEM/message/8894
.......
String about http://tech.groups.yahoo.com/group/CelestronCGEM/msearch?query=%22low+cog+%22&submit=Search&charset=UTF-8
.........
PHD DEC drift due to backlash ... (WRONG) - picture and links
http://www.flickr.com/photos/edhiker/5989220310/
........
My award for the most creative fix for CGEM cogging motors goes to Geert.
"Hello
I finally got a good simple working solution.
It is not very nice, but it is very simple and best of all, it works as it
should.
I putted a piece of cotton string with a couple of oil drops as a brake on the
motor axis.
The string is is about 2mm thick and the nice thing is that it is fastened with
the same screws which fastens the gear set to the motor so it can not move out
of place.
I added a picture of it in the file section under gvanhau.
Hope this solution is usefull for other who have the same problem.
regards
Geert
--- In CelestronCGEM@yahoogroups.com, "gvanhau"
.................................
I have my solutions involving adding a separate motor for DEC autoguiding, offsetting polar axis, and using my "zero-backlash" homemade drive.
PHD autoguide is a joy to use on a backlash free mount.
Saturday, May 05, 2012
Big Moon - almost full on 5/5/12 ... with "the Lady"
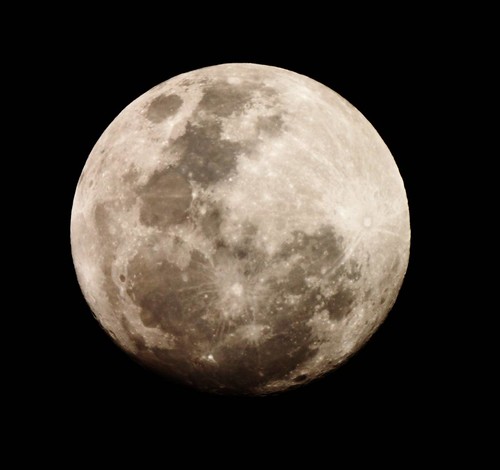
Big Moon - almost full on 5/5/12 ... with "the Lady"
If the full moon looks a bit bigger and brighter in tonight's sky, you're not seeing things: It's just the "supermoon" — the biggest moon of 2012.
.
Lady in the moon outline shown at: www.flickr.com/photos/edhiker/1259776527/
.
News for big moon tonight. ...
www.google.com/webhp#hl=en&output=search&sclient=...
.
.
The details of full moon and perigee:
(UT's) Full moon on May 6 at 3:35 -- Perigee May 6 at 4h UT at 220,160 miles. 33' 44"
That's 8:35 PDT Sat eve. and extremely full, just missed being eclipsed.
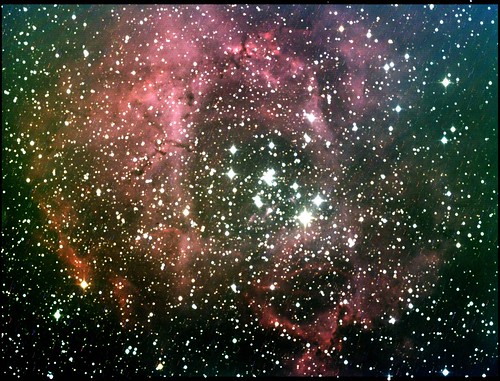
Friday, January 27, 2012
Rosette Nebula
What I didn't do -
To use BPM, need to do:
How to make a BIAS frame http://www.stark-labs.com/wiki/doku.php?do=export_raw&id=tutorials:nebulosity:kips_new_user_guide
Note: If you use a Bias frame you must first pre-process your dark frames by applying the MASTER BIAS frame to it, making the dark frames, a “clean” dark frame, using this cleaned dark frame when you pre-process your light frames. The uncleaned dark frame has the bias signal in it as well. If you do not do this, during pre-processing you will not remove the bias component. Don’t worry; I have instructions on what to do.
1. Cover the scope and take as many Bias frames as you did DARKFRAMES. Use the shortest duration time allowed by the software. Don’t get the BIASDARK confused with your DARKFRAMES. If you took 10 DARKFRAMES then you want to take 10 BIAS frames at 1ms.
2. Now, combine your Bias frames together and label it master bias.
3. Now, you must apply your MASTER BIAS frame to each individual DARK frame. Use the same method as though you were applying the dark frame to your light frames. Refer to STEP 2 ‘How to process images’. Combine the master BIAS frame to each DARK frame. When you use the process in step 2 you will select only bias then click done. Once you have done that, instead of selecting light frames like the window says you will simply select your dark frames. The DARK frames should now be labeled with PPRC attached to it. To keep it in simple terms, if you labeled your DARK frames as CRABDARK. They will now read “pproc_CRABDARK”
4. Now that the MASTER BIAS frame has been removed from the Dark frames, you need to stack the DARK frames that are labeled pproc. Once the dark frames have been combined, label the dark frames ‘FINALDARK’ or whatever you want, just as long as you know that the final bias process has been been completed. The ‘FINALDARK’ frame is what you will use in Neb to process in your light frames. When you process your frames the ‘FINALDARK ' will be used as your ‘MASTERDARK’ frame.
Tip. You can take your bias frames the same time you take your dark frames.
DON’T TRY TO CUT CORNERS TO SAVE TIME. YOU CAN’T STACK THE DARK FRAMES TOGETHER THEN REMOVE THE BIAS